Monitoring and troubleshooting

Monitoring and troubleshooting

Monitoring and troubleshooting

This section covers key homeowner resources, system monitoring tools, and in-depth troubleshooting guides for microinverters, gateways, meters, and more. Whether you're setting up a system, reviewing site data, or resolving performance issues, you'll find practical steps and visual examples to help you get the job done.

Homeowner resources

Give homeowners the tools they need to feel confident and in control. This section brings together essential guides, helpful system insights, and clear troubleshooting steps—all in one place. It’s designed to make things easier for both you and your customers. Share it with homeowners to help them understand their system, solve common issues, and stay informed from day one.
 

Getting connected

System health and monitoring

Understand system behaviour and key indicators to verify performance and spot issues quickly.

How to check if your system is functioning normally

What do LEDs on the Envoy or IQ Gateway mean?

What do the LEDs on my IQ Batteries indicate?

user

Managing access

Easily manage who can view or maintain your system.

Add another user to your system

Add a PV system maintainer

Charging station

Ownership & support

Find help with ownership transfers, support requests, or installer contacts.

Transfer system ownership

Contact your installer/maintainer

Contact Enphase Support

Understanding your system

Troubleshooting in the Enphase Installer Portal

Spot issues faster and fix them smarter. The Installer Portal gives you the tools to check system performance, run remote diagnostics, and dig into reports—all without stepping onsite. This section guides you through what to look for and how to take action with confidence.

Checking microinverter production and behaviour

To monitor how your microinverters are performing, go to the View tab and check the Power (W) values. You can navigate across different days and times to better understand the system’s performance.
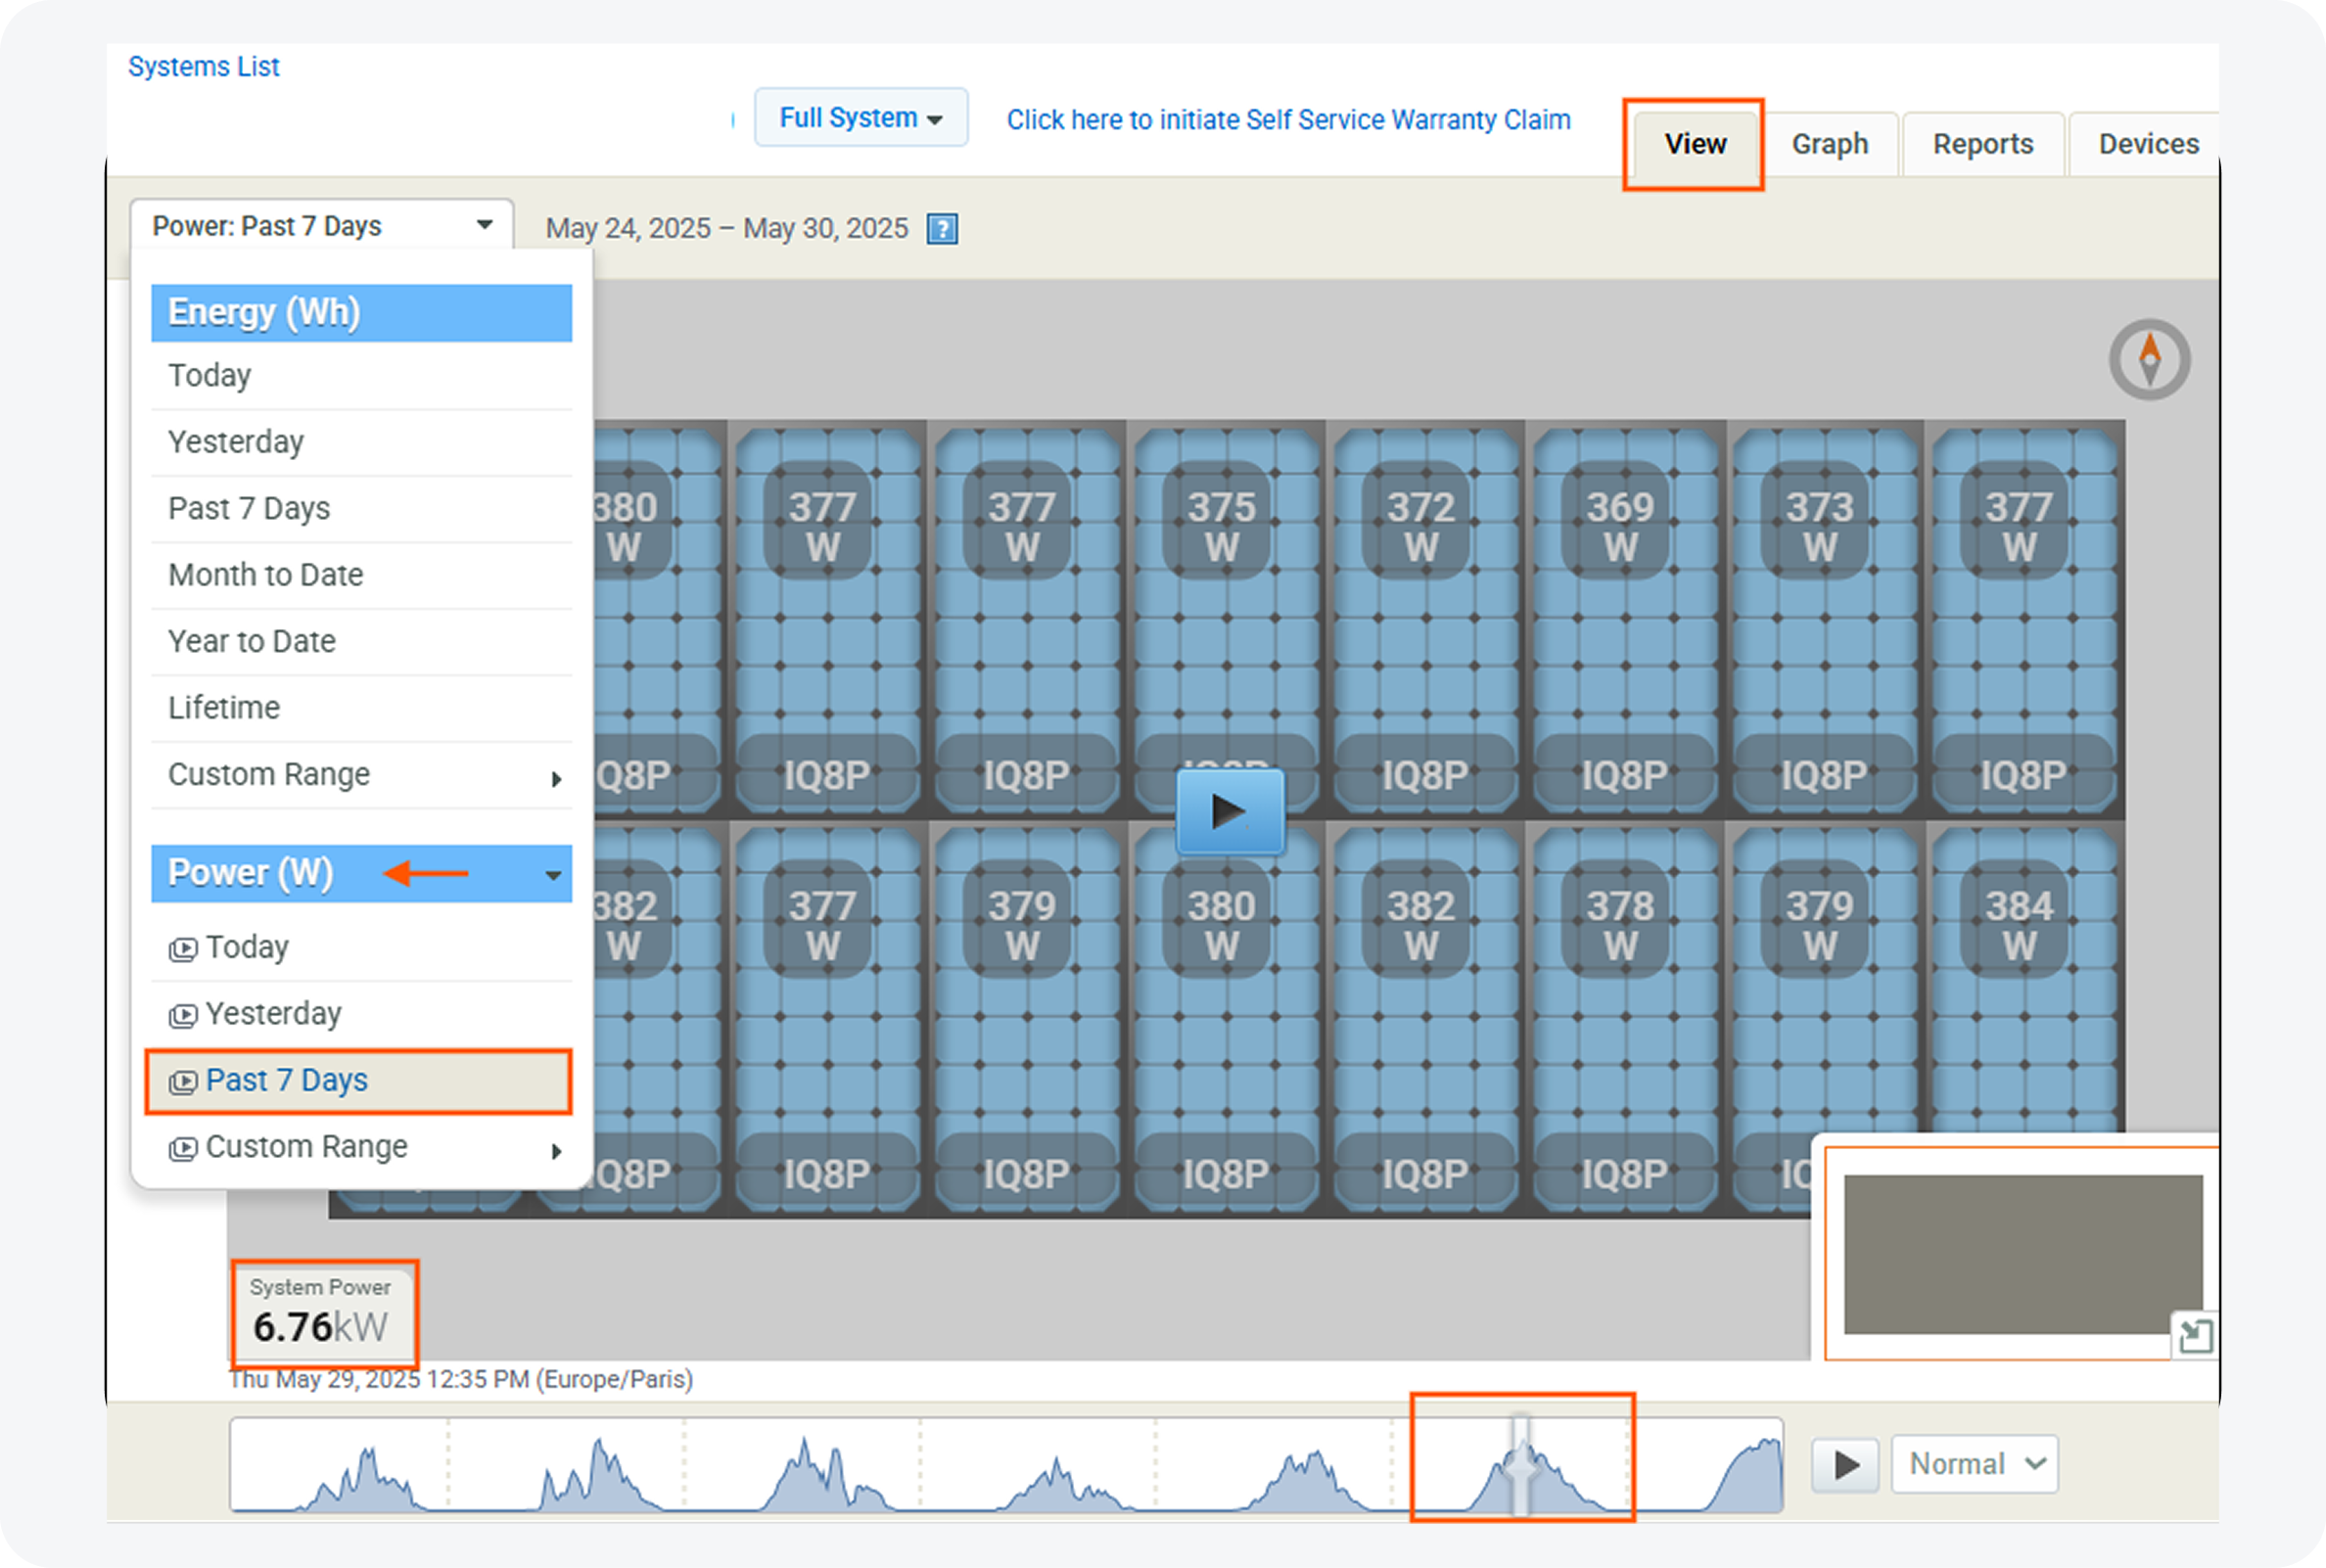
Checking micros


No reports or live data? Check gateway status

If you’re not seeing reports, updated data, or live status, open the Devices tab and check the gateway’s status. If it hasn’t reported in over 12 hours, it will show as Gateway Not Reporting. You can also confirm this by reviewing the Last Report column.
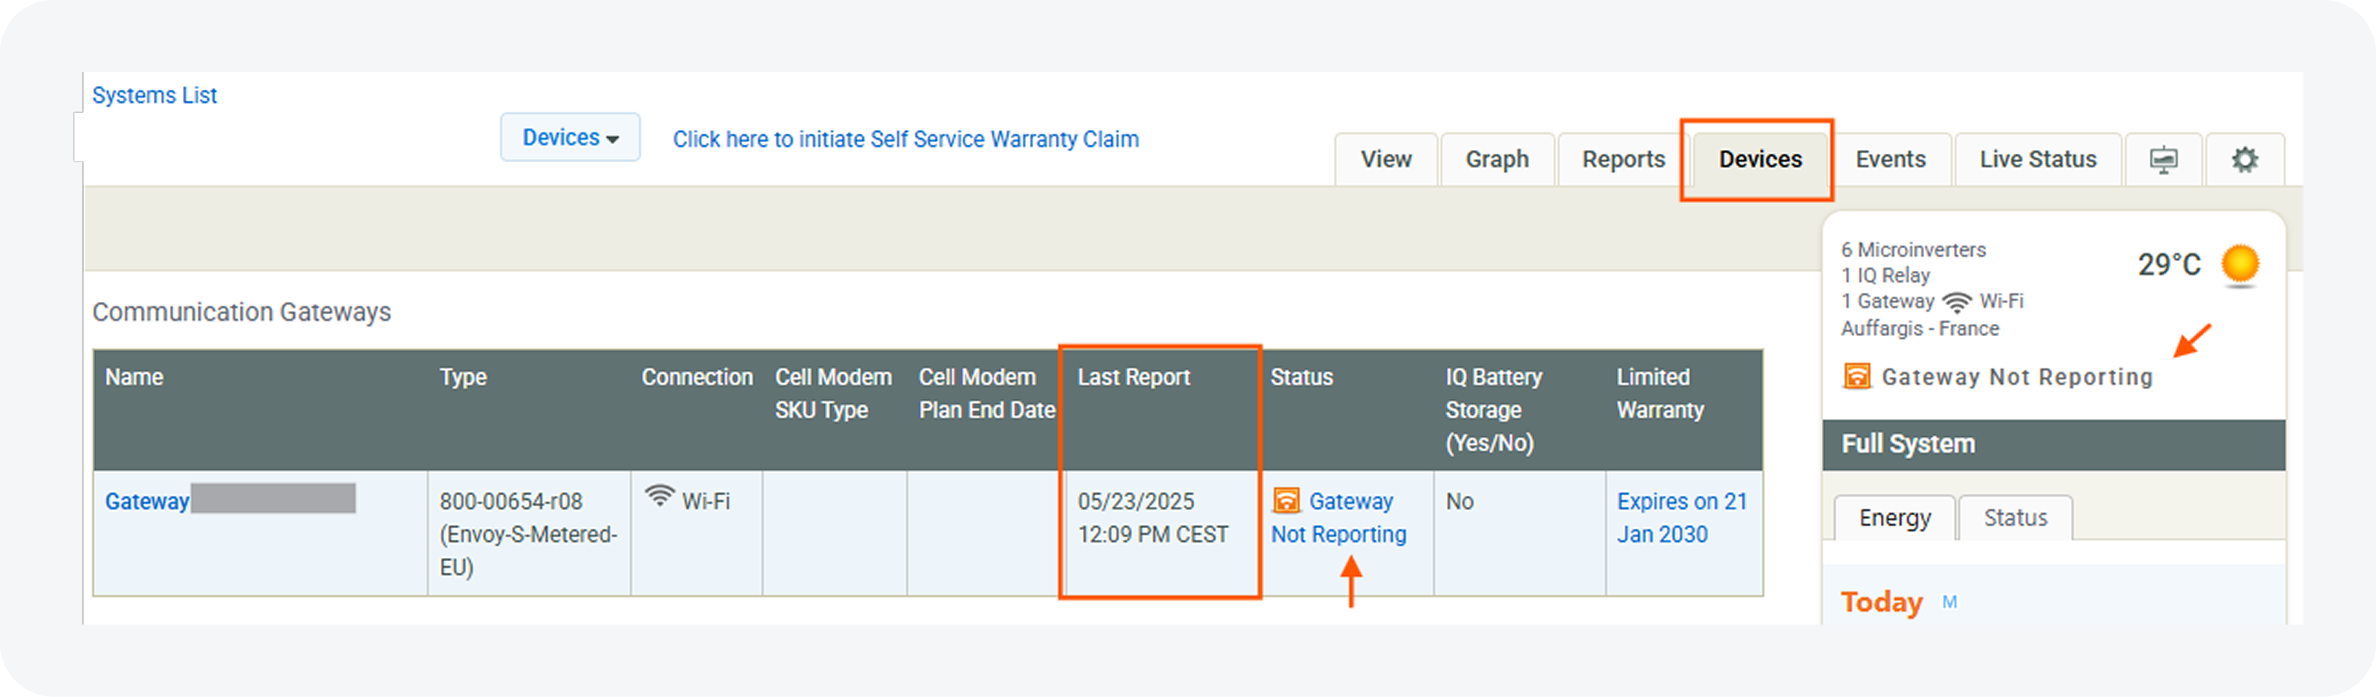
Device


Reviewing site events

Visit the Events tab to see both current and past system events. For more information and troubleshooting steps, click the icon in the Impact column.
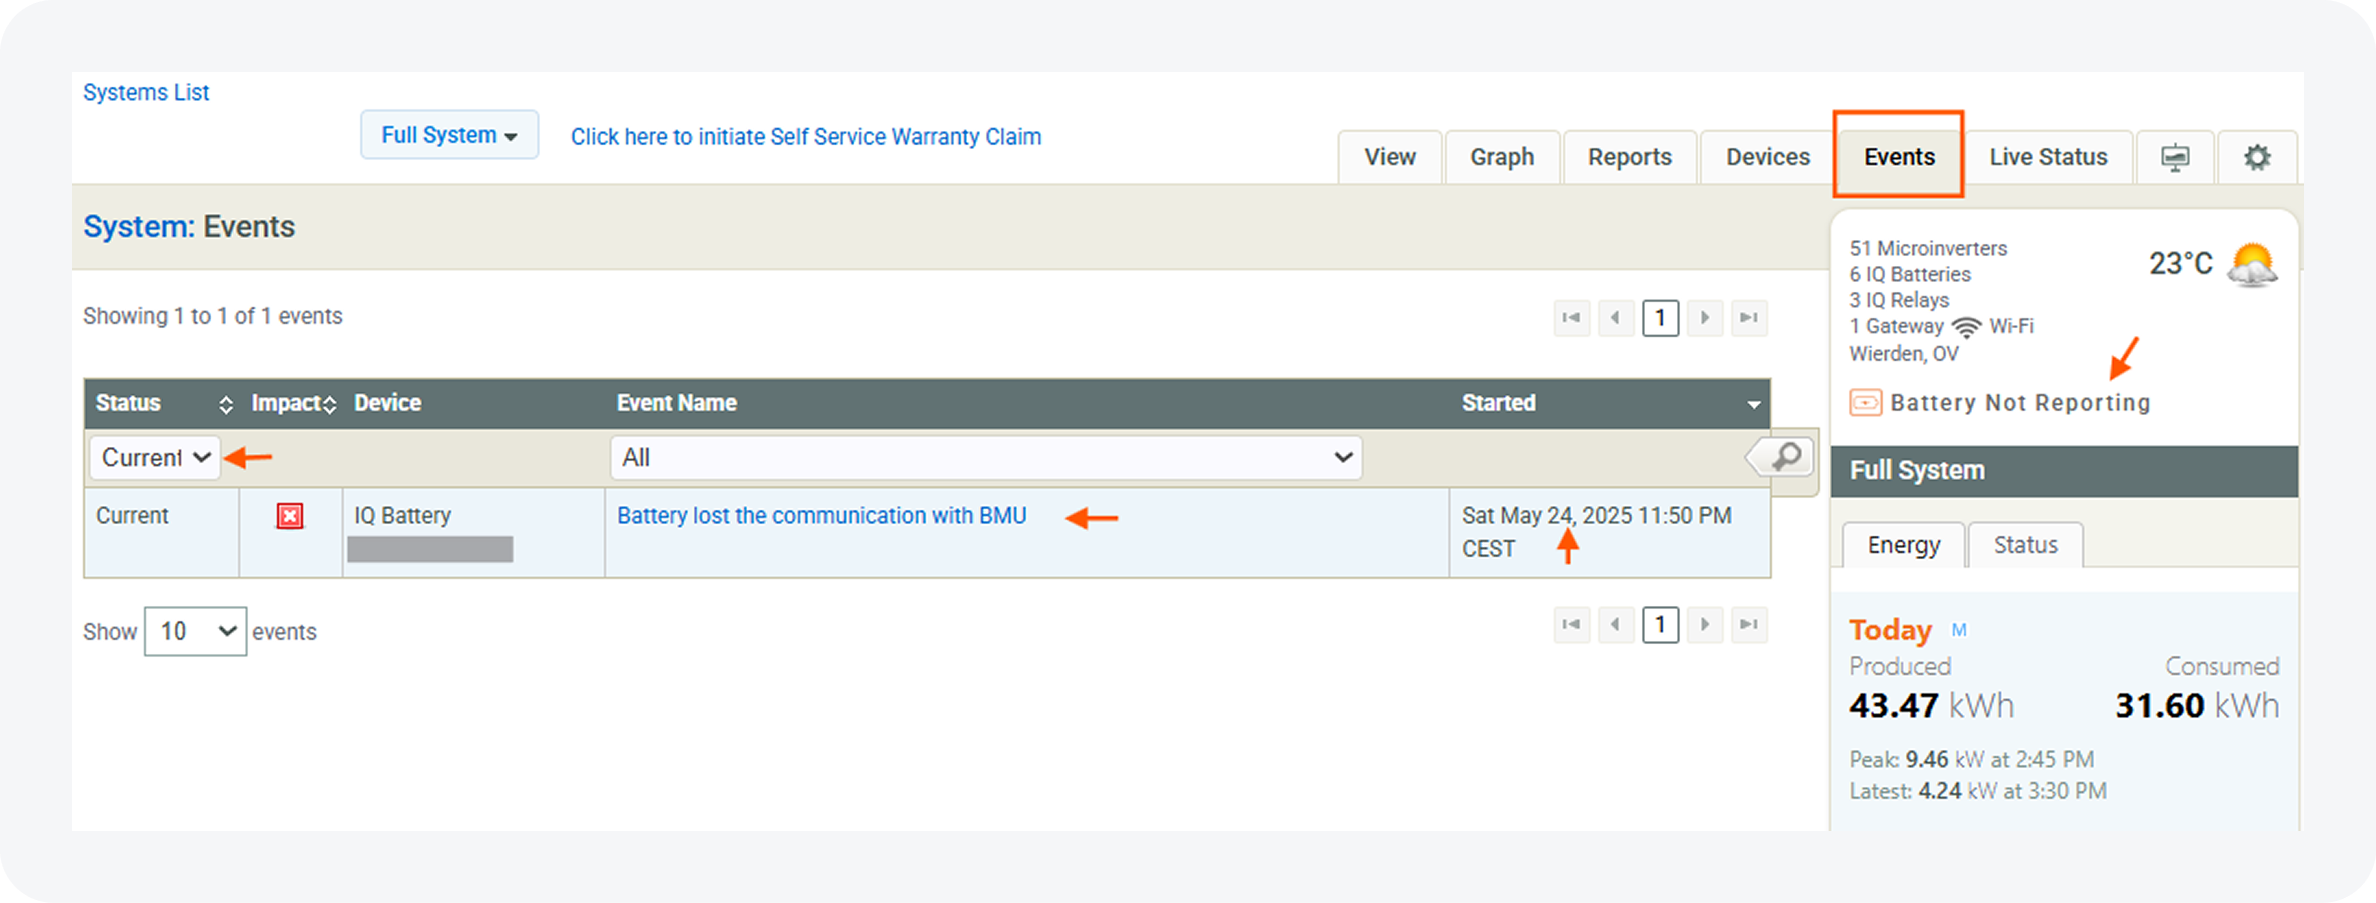
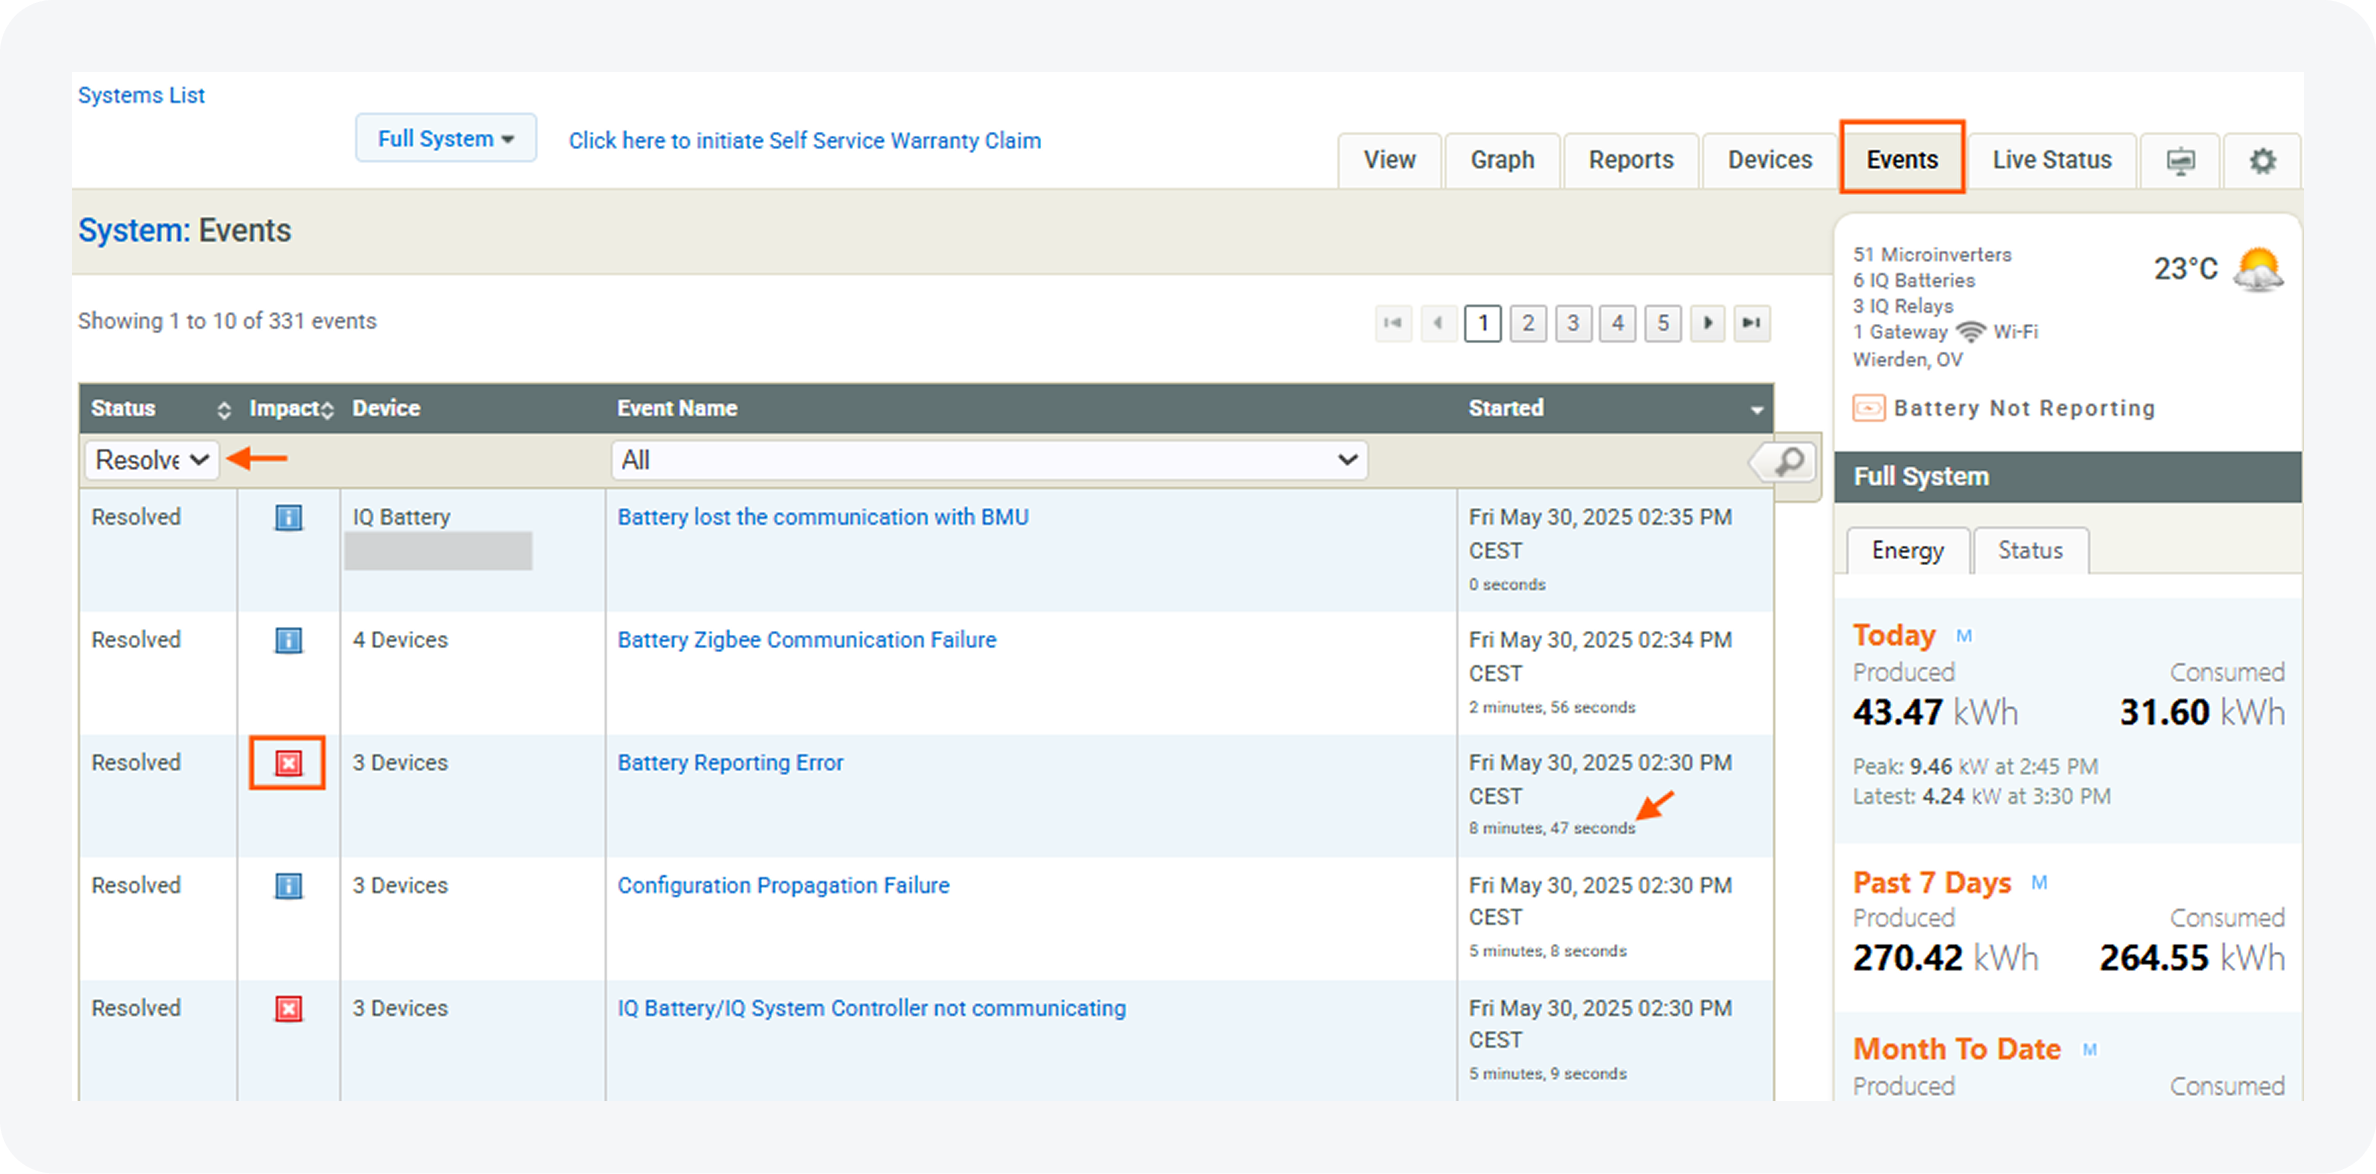
Event

Events


Generating reports

Under the Reports tab, you can generate detailed site reports, including information like Grid Profile Settings. These reports can be viewed directly or emailed to the account address.
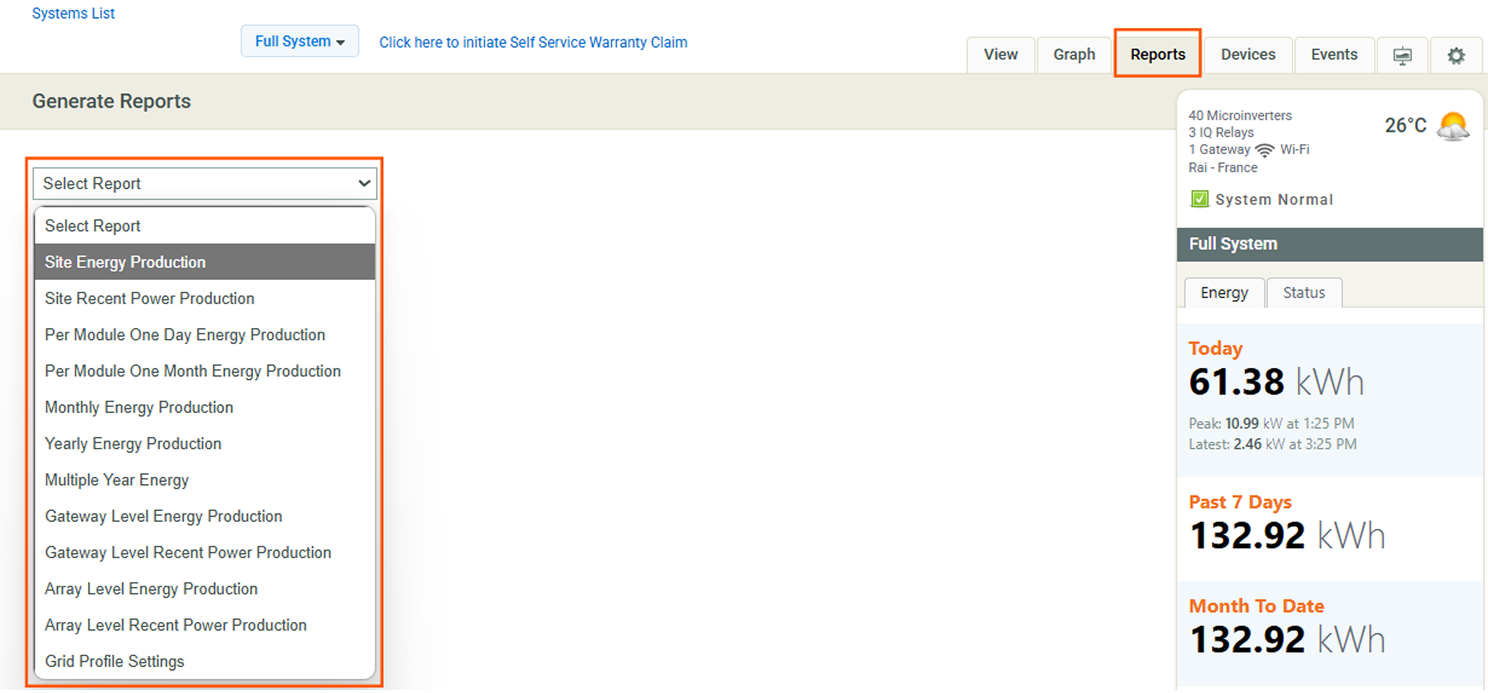
Generating reports


Accessing system diagnostics and remote tools

From the Installer Portal, navigate to the System Dashboard to access a high-level overview of the system. Within this dashboard, the System Diagnostics section allows you to perform remote actions such as rebooting devices or provisioning them again. These tools can help resolve certain issues without requiring a site visit.
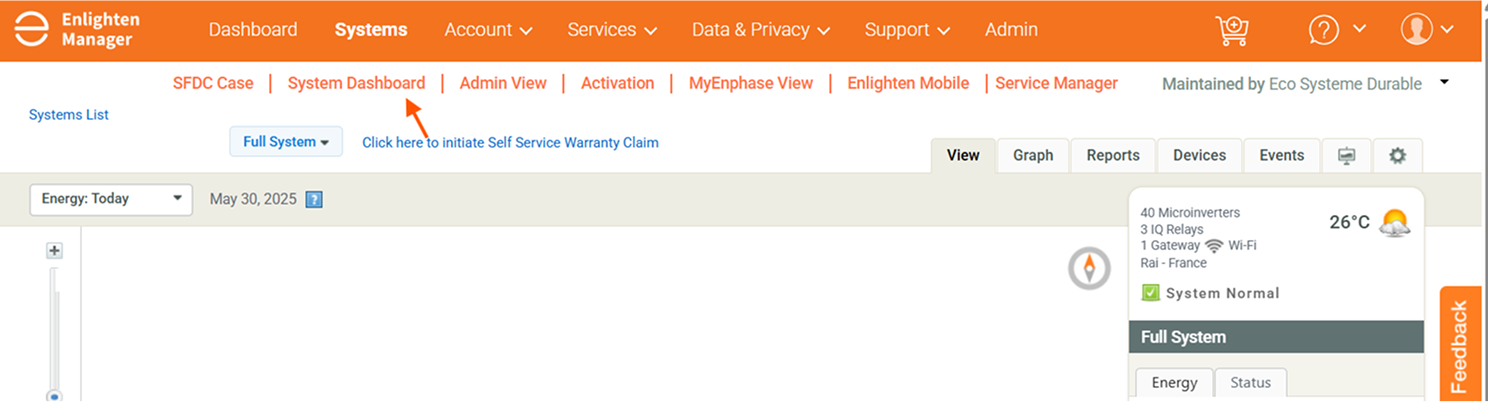
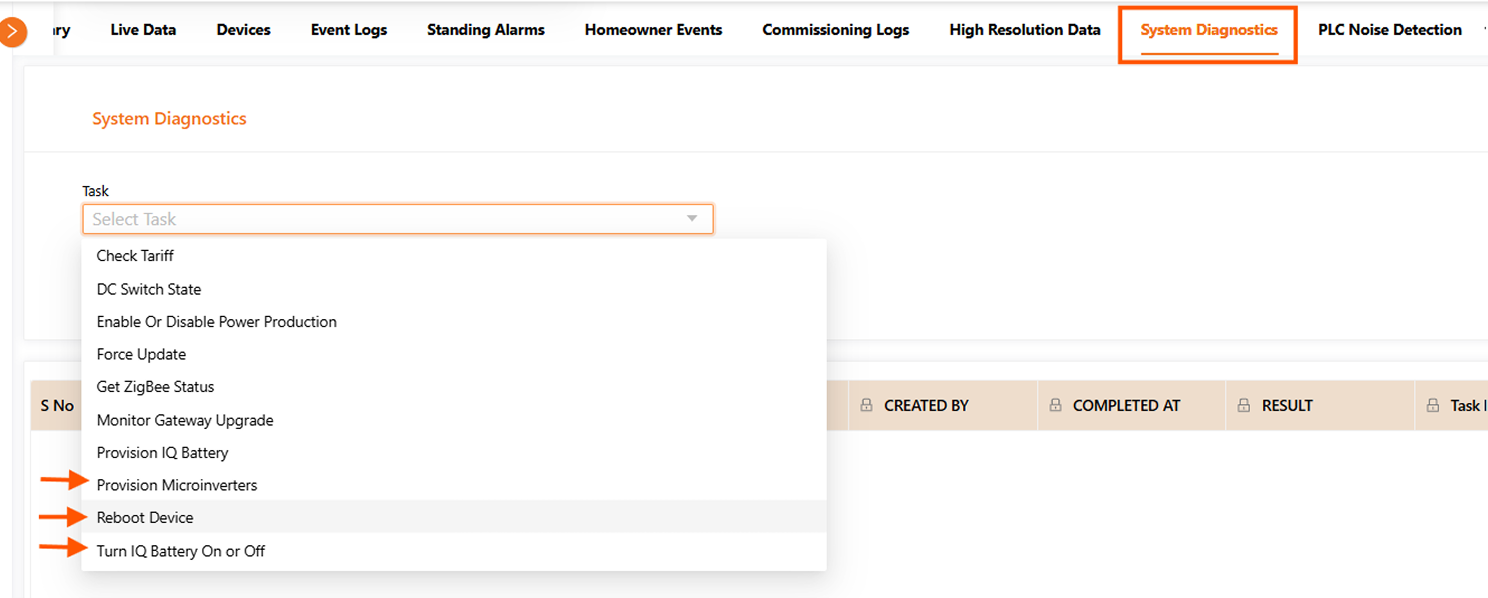
Accessing

Accessing system


Performing a PLC Noise Test

Also in the System Dashboard, you'll find the PLC Noise Detection section. Here you can run a noise test to detect any interference on the power line communication (PLC) used by the microinverters and gateway. 
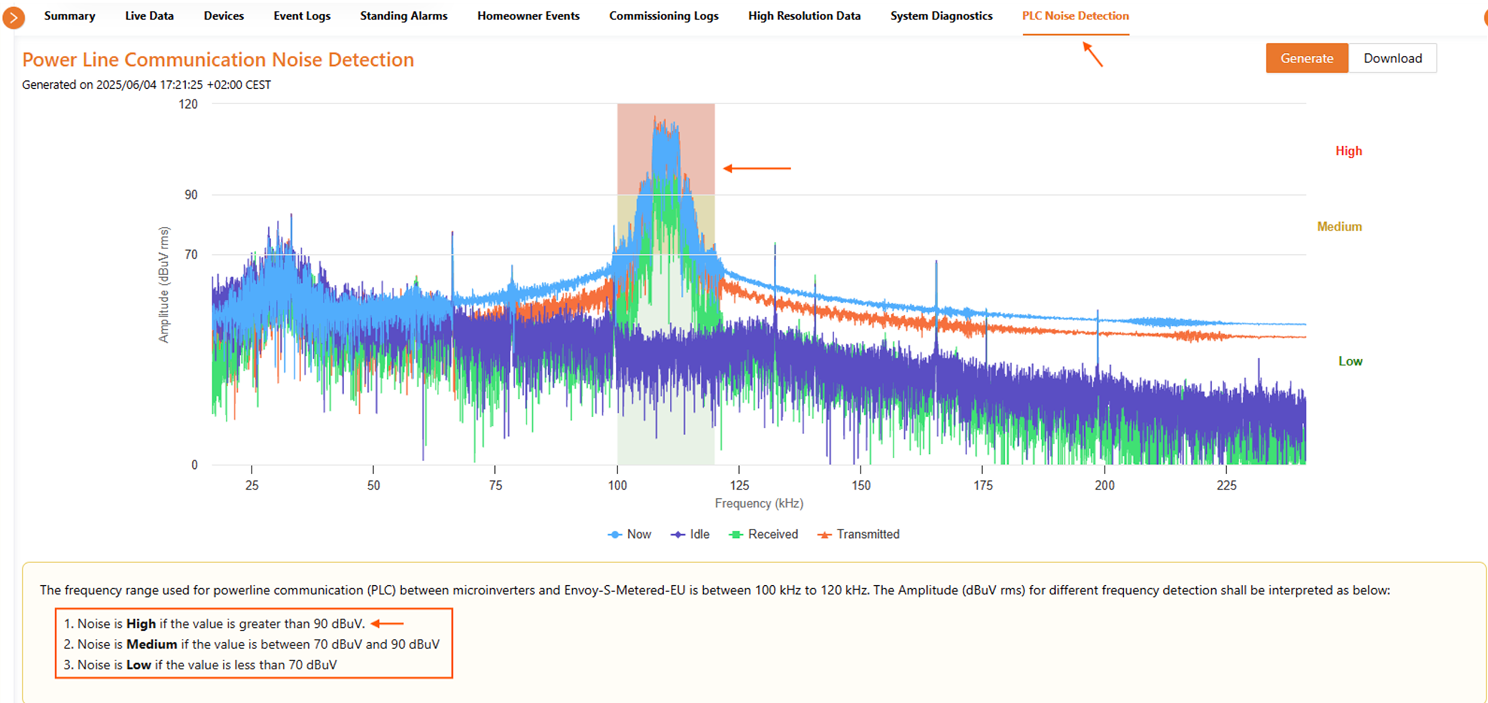
PLC


Viewing system production and consumption

In the Graph tab, you can track system production. If meters are installed, consumption data will also be available. You can view production and consumption per phase and compare microinverter data with the meter’s readings—very helpful for identifying discrepancies.

graph


Understanding three-phase behaviour

When viewing data by phase, you'll see production and consumption per phase. In three-phase systems, if you see positive values on one phase and negative on another during nighttime, it likely indicates a mix of phases.

ENLM 10


Troubleshooting negative consumption values during production hours

Case 1

If you’re seeing negative values on your meter during production hours, enable the data from the microinverters. If the meter shows lower values than the microinverters, it likely means that the CTs aren’t capturing all the production branches—resulting in incomplete measurement. For three-phase systems, this may indicate that the phases are mixed, leading to inaccurate production readings.

ENLM 1


Case 2

If production is being fully measured and the phase alignment is correct, another possible cause of negative values during production hours is the CT configuration. If your CTs are set to Load Only and negative values appear only when the system is producing, you’ll need to update the configuration. Go to the Devices tab, click on Enphase Integrated Consumption Meter, and change the CT configuration to Load with Solar.

Case 2

Troubleshooting the gateway

If the gateway isn’t reporting, it’s often due to internet issues—like weak Wi-Fi, router settings, or setup errors. This section helps you fix connection problems step by step, starting with proper placement and setup.
 

When activating a system for the first time, always ensure the gateway is installed in a location with strong Wi-Fi signal. If needed, use Wi-Fi repeaters or connect via Ethernet for a more stable connection.


  1. Understand the LED Indicators

    Start by checking the Gateway’s LED lights to identify the issue. 

    LED Indicators

    Learn more:

    • What do LEDs on the IQ Gateway or Envoy S mean?

    • What does a red light on the Envoy S or IQ Gateway mean?


  1. Check router compatibility

    • Ensure the router broadcasts a 2.4 GHz signal. The Gateway does not support 5 GHz.

    • If the router uses a combined SSID for both 2.4 GHz and 5 GHz, consider splitting them into separate network names in the router settings.


  1. Optimise gateway placement

    • Make sure the Gateway is within range of the router.

    • Avoid placing it near metal enclosures, thick walls, or other signal-blocking materials.


  1. Reconnect using the Enphase App

    • Open the Enphase App and follow the prompts to reconnect the Gateway to Wi-Fi.

    • You may need to manually enter the 2.4 GHz network name and password.

    Reconnect your Envoy S or IQ Gateway to Wi-Fi


  1. Restart devices

    • Power cycle both the gateway and the router.

    • Wait a few minutes, then attempt to reconnect.


  1. Use Ethernet (if available)

    If Wi-Fi issues persist, connect the gateway directly to the router using an Ethernet cable for a more reliable connection.


  1. Check for firewall restrictions

    If the gateway still won’t connect or shows issues with Live Status, there may be a firewall blocking communication. Check how to set up the Gateway if there is a firewall.


Additional resources 

How to fix a Gateway Not Reporting system error

Troubleshooting microinverters

If you have microinverters not reporting or you face production issues in one or more microinverters, start with this support guide, which covers the most common causes and fixes. This section also offers quick tips to help you identify whether the issue is due to electrical noise, AC faults, or panel-related problems—so you can troubleshoot more efficiently on-site.

Before replacing a device and requesting an RMA, make sure to follow the troubleshooting procedure and document the issue with clear pictures and videos—such as swapping micros, AC measurements, and LED status. These materials are essential for us to approve the RMA.
 

Microinverter LED status

What the lights mean


A quick look at the LED on the microinverter can already tell you a lot:

  • Green – Everything is working as expected.
  • Red – Indicates an AC issue (check the wiring).
  • Orange – The device is operating, but there may be a communication issue or it hasn’t yet been fully provisioned.

Use the LED status as your first checkpoint during troubleshooting.

PLC issues

Communication over power lines


Microinverters communicate through Power Line Communication (PLC). Electrical noise or interference can disrupt these signals.

  • Run a PLC noise scan through the Enphase Installer App (on site) or remotely via Enlighten Manager > System Dashboard > PLC Noise Detection to detect issues.
  • If interference is found, installing gapped ferrites can help reduce noise and improve communication.

You can also cross-check production values to identify communication issues:

  • In Enlighten Manager, enable the Microinverter production line in the graph.
  • If the meter (blue) production is significantly higher than the microinverter (grey) production, this suggests some devices aren’t communicating properly.
Understanding AC issues

What to check and where


AC issues can impact microinverter performance and are often caused by grid instability, wiring faults, or relay problems. Here’s how to quickly check for them: 

Use your tools:

  • Enphase Installer App (Toolkit):
    Go to Devices and Configuration > IQ Microinverters & Array to see each microinverter’s AC input and current production in real time.
  • Installer Portal (Enlighten Manager):
    Open a microinverter’s graph for detailed AC/DC voltage, frequency, temperature, and more.
    Check AC and DC values in the "View" tab to get a comprehensive overview of the system.

Signs of AC Issues:

  • High AC voltage (>242V) can cause microinverters to stop and resume production randomly.
  • If no AC is reaching a microinverter, it won’t produce or show data.
  • If several micros drop at once, check for an IQ-Relay, branch, or phase-level issue. 
DC issues

Panel or microinverter?


Sometimes a microinverter may show signs like not producing at all, producing less than the others, or even producing less than it used to. When that happens, the issue could be with either the microinverter or the connected PV panel.

Lower production isn't always a fault—it can also be caused by shading from nearby trees, chimneys, antennas, or other objects. Keep your surroundings in mind when diagnosing DC-side issues. 

To identify the root cause:

Swap the microinverter with another one that is known to be working.

  • If the issue follows the panel, then the PV module is likely faulty.
  • If the issue stays with the microinverter, the microinverter is probably the source of the problem. 

This simple swap test remains one of the most effective ways to troubleshoot and confirm DC-side production issues. 

Troubleshooting meter issues

In addition to the tools in the Installer Portal, this section gives you extra tips to identify and fix common metering problems—so you can ensure accurate readings and reliable system data.

CT installation tips

Accurate metering starts with correct CT placement. Use the Current Transformer Installation Guide to avoid common wiring mistakes and ensure reliable readings.


Understanding metering configurations

Learn the difference between Load Only and Load with Solar configurations.
 

Check our Consumption Metering Configuration Guide


Load with solar

Load with Solar
The consumption meter measures the combined flow of solar production and energy imported from the grid. This is the most recommended configuration in Enphase systems with solar, as it gives a complete picture of site consumption. Use this when both the load and solar are on the same side of the CTs.

al

Load Only
The consumption meter measures only what the home or site is using. It does not include any solar production in its readings. 

Compare production vs meter readings

Use the Enphase Installer Portal to compare production from microinverters (grey line) and meters (blue line). If meter readings are too low or show night-time production on 3-phase systems, you may have mixed CT phases.

compare productions

Warranty and labour reimbursement

All Enphase products include a standard warranty that covers manufacturing defects for a specific period, depending on the product. In some cases, labour reimbursement is also available for approved field replacements.

You can check the warranty terms and conditions here

If you need to submit an RMA (Return Merchandise Authorisation) or request a labour reimbursement, head over to the Service Manager section below for step-by-step guidance.

How to submit an RMA

Use this guide to request an RMA via the Service Manager platform.

  • Some RMAs are auto-approved based on system diagnostics
  • Others may require a manual review—have photos/videos ready

If the device no longer appears in your site’s inventory (e.g. it’s been retired), email us with the site details and device serial number so we can help you.

Service Manager guide

Download the full Service Manager guide to learn how to:

  • Submit and track RMAs
  • Request labour reimbursements
  • Monitor the status of your open cases

The guide includes step-by-step instructions for both desktop and mobile views.

Download the Service Manager guide

Services and Frequently bought products
Loading

Frequently bought together

Loading